

반응형 박스 자막에서 포인트 텍스트 2개 이상 설정하기
After Effect Blender expression Premiere 모션 그래픽 템플릿 애프터이펙트 익스프레션 프리미어
영상에서 자막 작업을 할 때 강조하고 싶은 단어나 구절 등을 포인트로 디자인하는 경우가 많이 있습니다. 이번에는 텍스트에 포인트를 주고 싶은 부분이 두 개 이상 있는 경우에 대해 만들어보겠습니다.
지난 시간에 만들어 놓은 컴포지션에 이어서 작업을 진행해도 되고 ctrl+D로 컴포지션을 복제해서 다른 컴포지션으로 만들어서 시작하셔도 됩니다.
포인트 텍스트에 구분자 사용하기split()
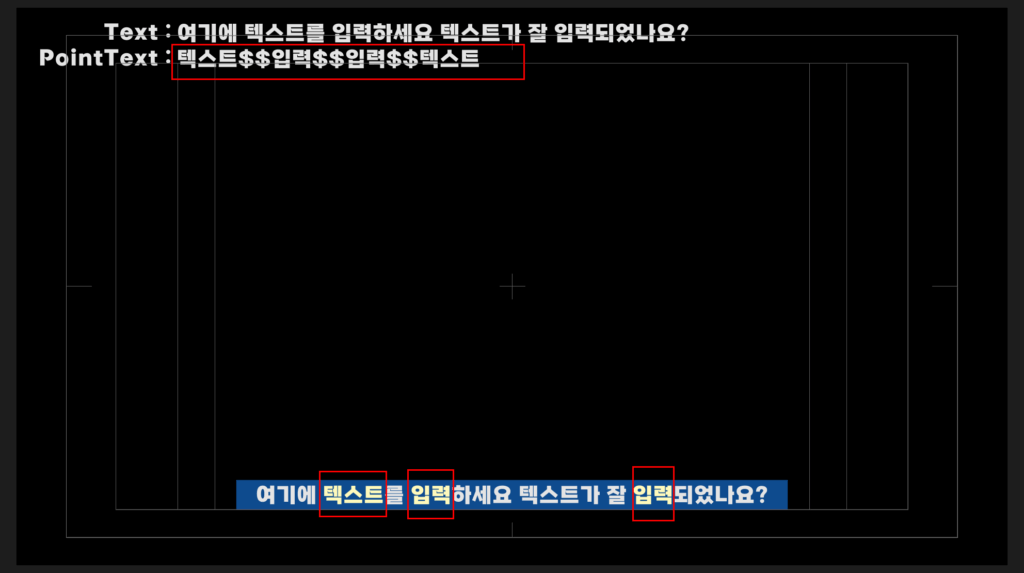
이번에는 포인트 텍스트가 2개 이상인 경우에 대해 이야기하려고 합니다. 이때는 구분자를 사용해서 포인트 텍스트를 구분합니다. split() 메서드를 이용하면 구분자를 기준으로 텍스트를 나눈 배열을 만들 수 있습니다.
//구분자로 $$외에 다른 것을 사용해도 됩니다.
const pointText = "여기$$텍스트$$입력";
//split("$$")을 이용하면 $$를 기준으로 텍스트를 나눠서 배열로 값을 출력해줍니다.
pointText.split("$$")
//[여기, 텍스트, 입력]가 출력됩니다.
지난 시간에 만들었던 RenderText레이어의 코드를 다음과 같이 바꿔보세요.
const fontColor = thisComp.layer("RenderText_Control").effect("FontColor")("Color");
const renderText = thisComp.layer("Text").text.sourceText;
const pointText = thisComp.layer("PointText").text.sourceText;
//구분자 $$를 사용해서 pointTextArray를 만들었습니다
const pointTextArray = pointText.split("$$");
//s는 pointTextArray 배열의 첫 번재 원소에 대한 인덱스 값을 찾습니다.
s = renderText.indexOf(pointTextArray[0]);
//n는 pointTextArray 배열의 첫 번재 원소에 대한 글자 수를 찾습니다.
n = (s === -1) ? 0 : pointTextArray[0].length;
//지난번과 같은 결과가 나옵니다.
text.sourceText.style.setFontSize(90, s, n).setFillColor(fontColor, s, n).setStrokeWidth(2, s, n).setStrokeColor([0,0,0], s, n).setText(renderText);
이렇게 바꾸면 정확하게 포인트 텍스트에 입력한 텍스트 중 첫 번째 요소를 포인트 텍스트로 출력하는 것을 확인할 수 있습니다.

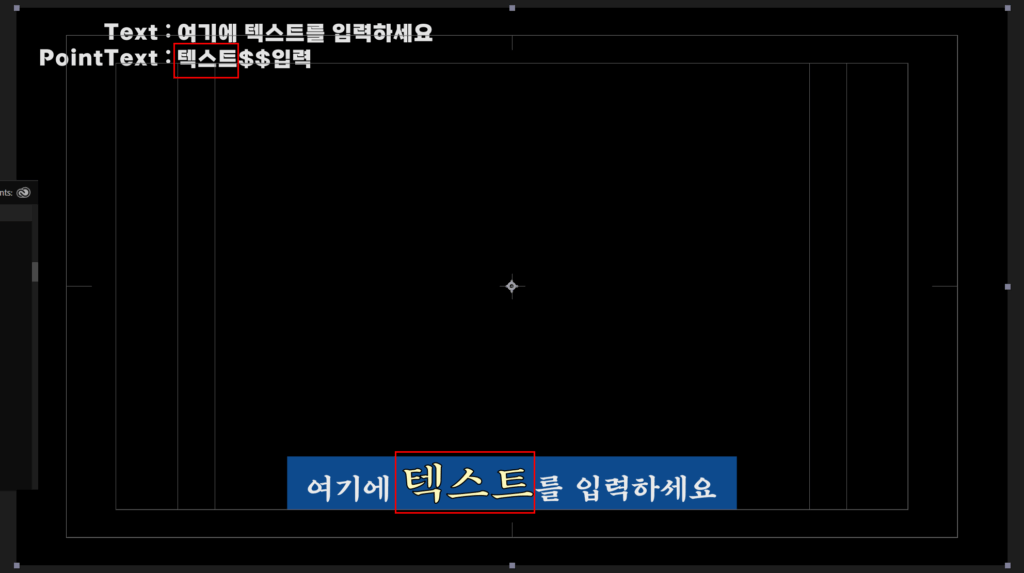
pointTextArray[0]을 pointTextArray[1], pointTextArray[2]로 바꿔서 테스트 해보세요. $$를 기준으로 구분한 pointTextArray의 원소의 두 번째, 세 번째 원소들만 포인트 텍스트로 인식하게 됩니다.
각각의 포인트 텍스트에 대한 start index, number of characters 계산하기
이번에는 자바스크립트번에는 자바스크립트의 배열 메서드 중 map()을 사용할 예정입니다. map() 메서드는 호출한 배열의 모든 요소에 주어진 함수를 호출한 결과로 채운 새로운 배열을 생성합니다. 즉, 배열을 정의역으로 하는 1:1 함수를 만들어 치역을 출력할 수 있습니다.
const array = [1, 2, 3];
//배열에서 map()을 사용하면 배열의 각각의 원소에 대해 1:1 함수를 적용할 수 있습니다.
//map()함수에 들어가는 x에는 array의 원소 1, 2, 3이 순차적으로 들어갑니다.
array.map(x => x*2);
//[2, 4, 6]
앞에서 작성되었던 코드를 다음과 같이 작성해보겠습니다. 일단 포인트 텍스트에서 폰트사이즈와 스트로크 부분은 삭제하였습니다. 색만 바뀌도록 변경했습니다.
const fontColor = thisComp.layer("RenderText_Control").effect("FontColor")("Color");
const renderText = thisComp.layer("Text").text.sourceText;
const pointText = thisComp.layer("PointText").text.sourceText;
//구분자 $$를 사용해서 pointTextArray를 만들었습니다
const pointTextArray = pointText.split("$$");

//startArray로 각각의 포인트 텍스트에 대한 s값을 배열로 만듭니다.
//포인트 텍스트의 start값을 배열로 만들 것이기 때문에 map()함수에 변수를 s로 작성하였습니다.
const startArray = pointTextArray.map(s => renderText.indexOf(s));

//numberArray로 각각의 포인트 텍스트에 대한 n값을 배열로 만듭니다.
//포인트 텍스트의 number of character값을 배열로 만들 것이기 때문에 map()함수에 변수를 n으로 작성하였습니다.
const numberArray = pointTextArray.map(n => n.length);

//일단 FillColor만 다루기 위해 폰트 사이즈와 스트로크는 삭제하였습니다.
//기존에 있던 s와 n들은 startArray와 numberArray의 각 원소들이므로 startArray[0], numberArray[0]으로 표현합니다.
text.sourceText.style.setFillColor(fontColor, startArray[0], numberArray[0]).setFillColor(fontColor, startArray[1], numberArray[1]).setFillColor(fontColor, startArray[2], numberArray[2]).setText(renderText);
이렇게 하면 3개의 포인트 텍스트가 전부 색칠되는 것을 알 수 있습니다. 이번에도 약간의 오류가 있습니다. 예외 처리를 하지 않은 것인데요. 만약 포인트 텍스트에 오타가 있다면 의도와는 다르게 적용되는 것을 확인할 수 있습니다.

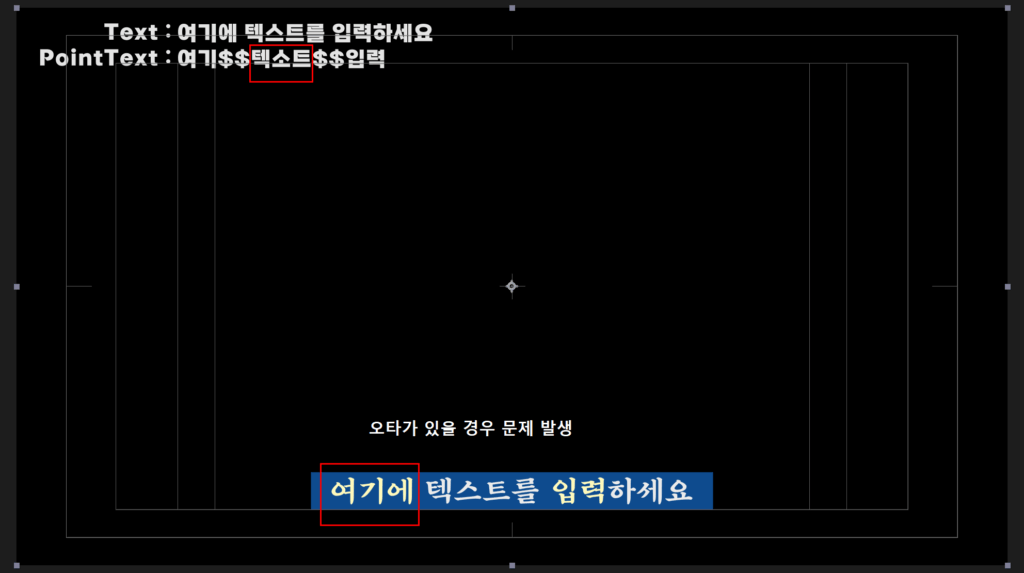
오타가 있을 경우 ‘여기’만 색칠되어야 하는 데 오타 ‘텍소트’가 3글자라 ‘여기에’가 색칠되는 것을 확인할 수 있습니다.
즉, startArray의 각각의 원소에 대해서 만약 원소 값이 -1이 나오면 거기에 대응하는 numberArray의 값이 0이 되도록 코드를 수정해줘야 합니다.
const fontColor = thisComp.layer("RenderText_Control").effect("FontColor")("Color");
const renderText = thisComp.layer("Text").text.sourceText;
const pointText = thisComp.layer("PointText").text.sourceText;
//구분자 $$를 사용해서 pointTextArray를 만들었습니다
const pointTextArray = pointText.split("$$");

//startArray와 numberArray를 빈 배열로 만듭니다.
const startArray = [];
const numberArray = [];
//pointTextArray의 각각의 원소 text에 대해 startIndex와 pointTextLength를 각각 계산하고 startArray와 numberArray에 push합니다.
pointTextArray.map(text => {
	const startIndex = renderText.indexOf(text);
	const pointTextLength = (startIndex === -1) ? 0 : text.length;
	startArray.push(startIndex);
	numberArray.push(pointTextLength);
});

//일단 FillColor만 다루기 위해 폰트 사이즈와 스트로크는 삭제하였습니다.
//기존에 있던 s와 n들은 startArray와 numberArray의 각 원소들이므로 startArray[0], numberArray[0]으로 표현합니다.
text.sourceText.style.setFillColor(fontColor, startArray[0], numberArray[0]).setFillColor(fontColor, startArray[1], numberArray[1]).setFillColor(fontColor, startArray[2], numberArray[2]).setText(renderText);
이렇게 작성하면 pointTextArray의 각각의 원소 텍스트에 대해 startIndex와 pointTextLength를 계산한 뒤 startArray와 numberArray 배열의 원소로 넣어줍니다.
이때 사용한 것이 push()입니다. push() 메서드는 배열의 끝에 명시된 요소를 추가하고 배열의 새로운 길이를 반환합니다. push() 메서드로 기존의 배열의 끝에 새로운 원소를 추가할 수 있습니다.
const array = [1, 4];
array.push(3);
//array = [1, 4, 3] 배열의 끝에 3을 원소로 추가합니다.

const length = array.push(3);
//array = [1, 4, 3, 3]이 되었으므로 length는 4를 출력해줍니다.
//push() 메서드가 배열의 끝에 명시된 요소를 추가하고(기존 배열을 새로운 배열로 바꿔주고) 배열의 새로운 길이를 반환하는 것에 주목하세요.
지금은 실제 RenderText를 출력하는 부분이 매우 길어져서 코드의 가독성이 좋지 않습니다. 그리고 각 요소에 대해 시작 값과 텍스트 개수를 계속 나열해주다 보니 포인트 텍스트의 개수가 많아지면 해당 코드를 더 길게 작성해줘야만 합니다. 이 부분을 수정해보겠습니다.
//전체 텍스트가 아니라 포인트 텍스트에만 적용되는 컬러이므로 변수명을 pointColor로 바꿨습니다.
const pointColor = thisComp.layer("RenderText_Control").effect("FontColor")("Color");
//rendetText로 출력하는 것이 가독성 측면에서 좋을 것 같아서 변수명을 totalText로 바꿨습니다.
const totalText = thisComp.layer("Text").text.sourceText;
const pointText = thisComp.layer("PointText").text.sourceText;
//구분자 $$를 사용해서 pointTextArray를 만들었습니다
const pointTextArray = pointText.split("$$");

//startArray와 numberArray를 빈 배열로 만듭니다.
const startArray = [];
const numberArray = [];
//pointTextArray의 각각의 원소 text에 대해 startIndex와 pointTextLength를 각각 계산하고 startArray와 numberArray에 push합니다.
pointTextArray.map(text => {
	//rendetText로 출력하는 것이 가독성 측면에서 좋을 것 같아서 변수명을 totalText로 바꿨습니다.
	const startIndex = totalText.indexOf(text);
	const pointTextLength = (startIndex === -1) ? 0 : text.length;
	startArray.push(startIndex);
	numberArray.push(pointTextLength);
});

//renderText를 정의합니다. renderText는 pointTextArray의 원소 수에 따라 text.sourceText.style.setFillColor(pointColor, startArray[0], numberArray[0]).setFillColor(pointColor, startArray[1], numberArray[1])... 늘어날 것이므로 let으로 변수를 설정했습니다.
let renderText = text.sourceText.style;

// for 문을 통해 반복적인 작업을 처리했습니다.
for (let i = 0; i < pointTextArray.length; i++) {
	renderText = renderText.setFillColor(pointColor, startArray[i], numberArray[i]);
}
//renderText는 스타일까지로 정의했으므로 setText(totalText)를 붙여서 출력합니다.
renderText.setText(totalText);
for 문을 사용했습니다. renderText는 i가 0부터 pointTextArray의 원소의 개수 만큼 반복해서 .setFillColor(pointColor, startArray[i], numberArray[i])를 renderText 뒤에 붙여서 출력해줍니다.
앞에서 .setFillColor(pointColor, startArray[0], numberArray[0])…이렇게 타이핑 쳤던 것을 자동으로 계산해서 붙여주게 됩니다.
//for 문은 i가 0부터 3보다 작은 2까지 i++(1씩 증가하면서) 차례대로 반복해서 작업해야할 코드를 실행시켜줍니다.
for (let i = 0; i < 3; i++) {
  반복해서 작업할 코드
{

//그러므로 다음 코드는
for (let i = 0; i < pointTextArray.length; i++) {
	renderText = renderText.setFillColor(pointColor, startArray[i], numberArray[i]);
}
//아래와 같이 변환됩니다.
renderText.setFillColor(fontColor, startArray[0], numberArray[0]).setFillColor(fontColor, startArray[1], numberArray[1]).setFillColor(fontColor, startArray[2], numberArray[2])
for 문의 경우 요즘은 코드 작성 시 지양하는 형태의 반복문입니다. 반복문은 for문 뿐 아니라 for each문 while문 등 많이 있지만 요즘은 가급적 map이나 reduce를 사용합니다.
그리고 지금 작업한 코드는 startArray, numberArray, renderText를 전부 분리해서 코드를 작성하다 보니 많이 길어졌습니다. 간결하게 리펙토링 해보도록 하겠습니다.
const pointColor = thisComp.layer("RenderText_Control").effect("FontColor")("Color");
const totalText = thisComp.layer("Text").text.sourceText;
const pointText = thisComp.layer("PointText").text.sourceText;
const pointTextArray = pointText.split("$$");

let renderText = text.sourceText.style;

// 포인트 텍스트 배열의 각 원소 text에 대해 바로 startIndex와 text의 길이를 정의하고 renderText에 적용하였습니다.
pointTextArray.forEach(text => {
    const startIndex = totalText.indexOf(text);
    //startIndex 값이 -1이 아니고, text에 텍스트가 들어 있는 경우만 renderText에 setFillColor를 적용하였습니다.
    if (startIndex !== -1 && text.length > 0) {
        renderText = renderText.setFillColor(pointColor, startIndex, text.length).setText(totalText);
    }
});

// 최종 적용된 renderText를 출력
renderText;
여기까지만 해도 우리가 원하는 기능은 구현되었다고 볼 수 있습니다. 그런데 이러한 경우가 생길 수도 있죠. 예를 들어, 포인트 텍스트가 같은 단어가 2개가 있다면?
지금 같은 경우는 무조건 totalText에서 각각의 포인트 텍스트를 앞에서 부터 찾습니다. 따라서 중복되는 포인트 텍스트는 뒷 부분이 색칠되지 않습니다.
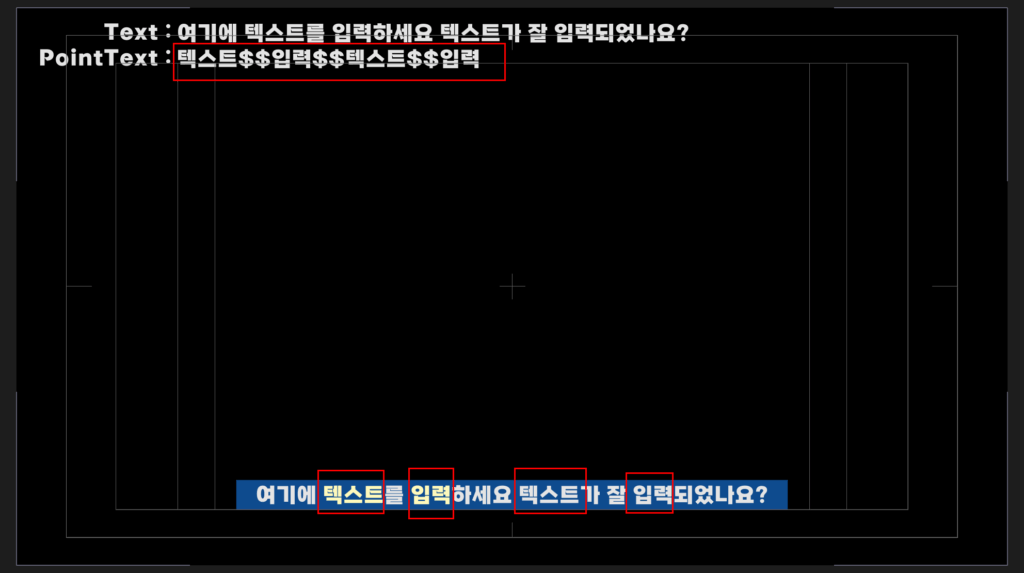
이러한 경우죠. 이러한 경우를 위해 코드를 다시 리펙토링 해보겠습니다.
핵심은 포인트 텍스트를 항상 처음부터 찾는 것이 아니라 이미 찾은 구간까지는 제외하고 그 뒤 부터 포인트 텍스트를 찾아야 하는 겁니다.
const pointColor = thisComp.layer("RenderText_Control").effect("FontColor")("Color");
const totalText = thisComp.layer("Text").text.sourceText;
const pointText = thisComp.layer("PointText").text.sourceText;
const pointTextArray = pointText.split("$$");

let renderText = text.sourceText.style;
// pointTextArray의 원소를 차례대로 찾아나가는 데 totalText에서 몇 번째 문자부터 찾을 것인지를 searchIndex 변수로 정의했습니다.
let searchIndex = 0;

pointTextArray.forEach(text => {
	//indexOf는 indexOf(searchElement, fromIndex)이렇게 두개의 변수를 받을 수 있는데 두 번째 변수가 들어가면 fromIndex의 위치부터 검색을 시작합니다.
    const startIndex = totalText.indexOf(text, searchIndex);
    if (startIndex !== -1) {
        renderText = renderText.setFillColor(pointColor, startIndex, text.length).setText(totalText);
        searchIndex = startIndex + text.length;
    }
});

renderText;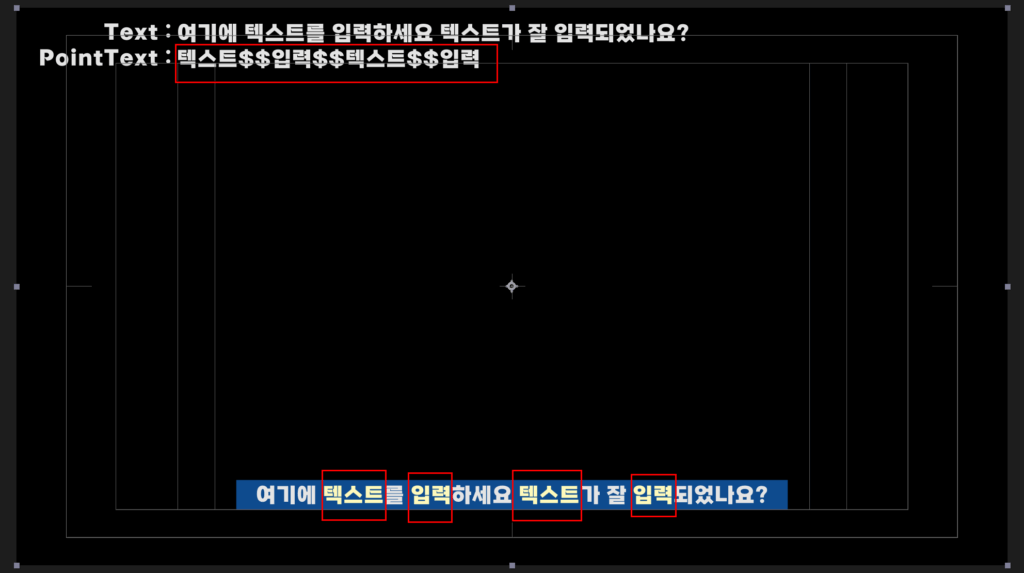
이렇게 의도한대로 포인트 텍스트를 앞에서 부터 하나 찾고, 찾은 데부터 다시 다음 포인트 텍스트를 찾도록 수정되었습니다.
만약에 포인트 텍스트의 색을 2개로 정의한다면 어떻게 하면 될까요?
심플하게 방금 했던 과정을 한 번 더 하게 코드를 추가하면 됩니다.
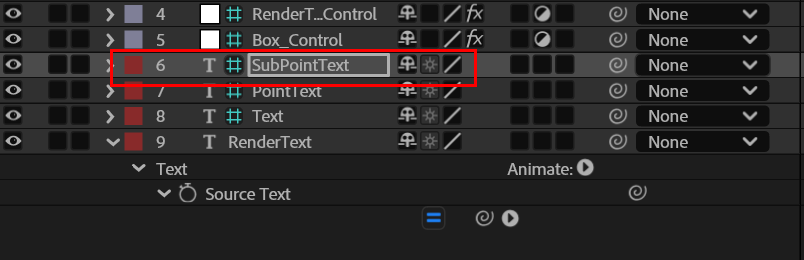
먼저 SubPointText레이어를 하나 더 추가하고, 여기에 입력한 텍스트는 다른 컬러를 출력할 수 있도록 RenderText_Control레이어에 Color Control 효과를 추가한 뒤 네이밍을 바꿔주세요.
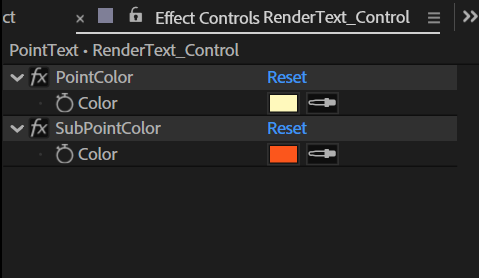
const pointColor = thisComp.layer("RenderText_Control").effect("PointColor")("Color");
const subPointColor = thisComp.layer("RenderText_Control").effect("SubPointColor")("Color");
const totalText = thisComp.layer("Text").text.sourceText;
const pointText = thisComp.layer("PointText").text.sourceText;
const subPointText = thisComp.layer("SubPointText").text.sourceText;
const pointTextArray = pointText.split("$$");
const subPointTextArray = subPointText.split("$$");

let renderText = text.sourceText.style;
let searchIndex = 0;

pointTextArray.forEach(text => {
    const startIndex = totalText.indexOf(text, searchIndex);
    if (startIndex !== -1) {
        renderText = renderText.setFillColor(pointColor, startIndex, text.length);
        searchIndex = startIndex + text.length;
    }
});
//여기서 이미 renderText가 text.sourceText.style.setFillColor(pointColor, startIndex, text.length)가 붙어서 나온 상태입니다.

// subPointText 처리 시 초기화합니다. 다시 totalText 처음부터 검색을 시작합니다.
searchIndex = 0;
subPointTextArray.forEach(text => {
    const startIndex = totalText.indexOf(text, searchIndex);
    if (startIndex !== -1 && text.length > 0) {
        renderText = renderText.setFillColor(subPointColor, startIndex, text.length);
        searchIndex = startIndex + text.length;
    }
});
//.setText(totalText)가 중복으로 붙지 않도록 출력할 때 붙여서 출력합니다.
renderText.setText(totalText);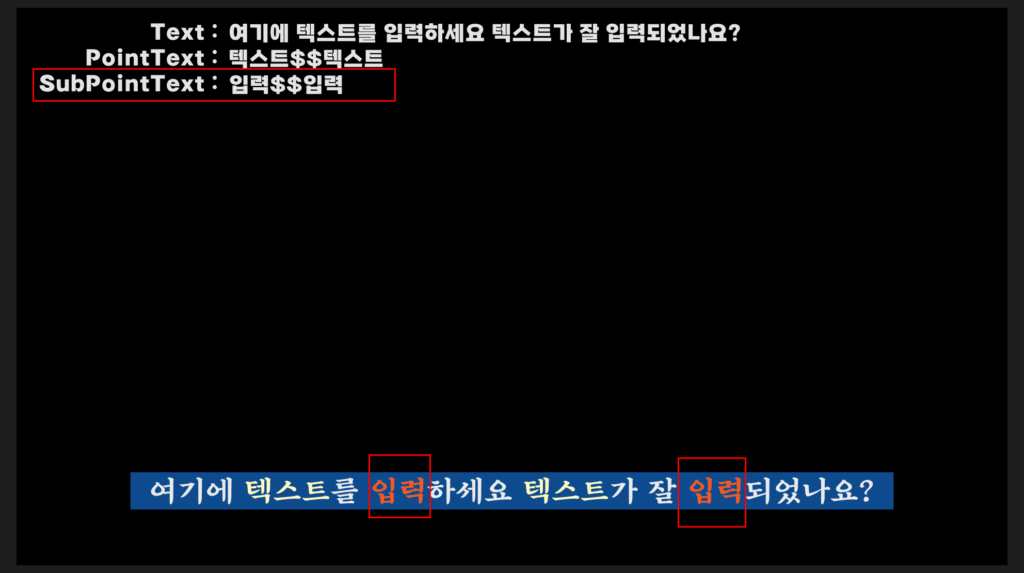
원하는대로 잘 구현되었는지 테스트 해보세요.
for 문, forEach문 같은 경우 요즘은 잘 사용하지 않습니다. 요즘은 배열의 원소 수가 변하지 않는 경우는 map, 배열의 원소 수가 변하는 작업의 경우(지금 처럼 배열을 넣었는 데 결국 하나의 값을 출력하는 경우)는 reduce를 사용해서 코드를 작성하는데 reduce는 쉽게 이해하기가 조금 어렵습니다. 추후에 reduce에대해서도 기회가 생기면 설명드리고 코드를 리펙토링 해보도록 하겠습니다.
다음에는 지금 작성한 코드를 재사용하기 편하게 리펙토링 하고 자막 작업을 할 수 있는 기본 컴포지션을 완성해보도록 하겠습니다.
그럼 이만~
P.S 포스팅을 하면서 템플릿들을 하나씩 정리하며 업로드 하는 사이트를 만들고 있습니다. 다운 받으시는 분들이 늘어나고 반응이 괜찮으면 회원 가입을 받고 서로의 자료를 공유하는 식으로 발전시키면 어떨까 생각됩니다. 편하게 구경해보시고 템플릿 다운받아 가세요.
답글 남기기